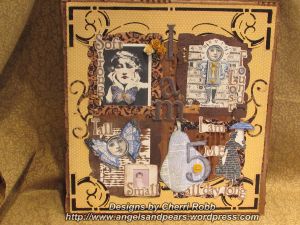
This is my entry for the Stencil Girl Products & Lost Coast Designs Rubberstamps BLOG HOP … and is my first Vision Board. It just sort of happened … and was a lot of fun to create. I worked on it over several weeks … as I created the background and four different vision frames. Instructions and a list of the stencil and stamps used are shown below. My board makes me smile and I keep going back to look at it! Read the board as … I am soft and strong, I am lost and found, I am tall and small, I am ME all day long!
StencilGirl Talk
LeighSBDesigns
Mary Beth Shaw
Mary Nasser
Cherri Robb YOU ARE HERE! … please remember to leave a comment and THANKS FOR CHECKING OUT MY BLOG HOP ENTRY!
Judy Shea
Bibiana Martinez-Ziegler
Linda Kittmer
Carolyn Dube
Leslie B. Turner
Janet Joehlin
Karen McAlpine
Leslie Tucker Jenison
DominoARTblog
Lindsay Weirich
Maria McGuire
Beginning Steps: My inspiration began with 2 stencils from Stencil Girl Products and several new stamps from Lost Coast Designs. So first I stamped all the images I thought I might use and cut them out. Then I played around with the stencils using several different color mediums. I love using cardboard as my foundation layer, and because the stencil was 12 inches wide, I cut a 13 inch square piece of cardboard. After I had laid the stencils and stamps out on the cardboard, I had the vision to create four windows into artful journey of who I am.
Board Background: Using a box cutter and straight edge, I cut cardboard from a box to 13 by 13 inches. Then I used an awl to pull off some of the top layer of paper and expose spots of ‘corrugated’ inside of the cardboard. I sprayed the cardboard with several different colors of Moon Glow’s Moon Shadow Mist. When dry the cardboard had warped, so I turned it over and sprayed it lightly with plain water, then weighed the corners with bottles of glue. It dried flat … so there!
Next, I stenciled the Swatton Borders #1 stencil using acrylic paint (Van Gogh Oxide Black) onto a 2 by 12 inch piece of yellow pot-a-dot cardstock. I cut around the curvy side of the stencil with scissors, and cut the other three sides with a deckled edge rotary cutter. I rubbed the edges of the cardstock with a black ink pad. Repeat for second bottom stencil section. Also cut two more pieces of 2 by 12 inch matching cardstock for left and right sides of vision board. Do not assemble.
##
Vision Frame 1: Steps include (1) the “Head in Hands” image stamped in Memento tuxedo black ink on smooth surface off white cardstock; cheeks and lips colored with chalk pencils; (2) Sizzix “Frame, Decorative Rectangle” die cut, I edged the frame with ink so it doesn’t show white; (3) Words “soft & strong” stamped lettter-by-letter with Memento Rich Cocoa ink, then cut out as full words; (4) restamp “Head in Hands” with Memento Danube Blue ink and cut out butterfly only; (5) Distress edges of words and butterfly with Memento Rich Cocoa and Potters Clay inks; (6) sew button onto center of butterfly then mount butterfly with 3D glue dots onto full stamp image; (7) twist wire of three flowers together, wrap individual wires around awl to create coils; (8) mount image inside die cut frame; add paper flowers; do NOT add words at this time. Set aside.
Vision Frame 2: Repeat instructions above for “Time Flies” image including second stamping in blue, cut out full image and blue key hole. Also repeat stamping for words “Lost” and “Found. Next stamp “Rulers” background image and mount behind die cut frame. Distress and color image and key hole as shown in photo. Add brads to key hole, mount key hole to image with 3D glue dots. Mount “Time flies” to background with glue stick. Sew on key embellishment and a “corner” embellishment; do NOT add words at this time. Set aside.
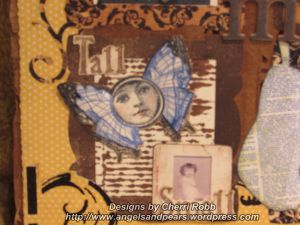
Vision Frame 3: I made the background for this frame using the “Journal Notes” stencil by Stencil Girl Products. Instead of stippling with acrylic ink, on this one I used the Ranger/Tim Holtz “Distress Paint” dauber in walnut stain. Mount the stenciled background behind the die cut frame. Follow the same instructions above for stamping the image in rich cocoa and danube blue, cutting out the inside lines of the blue butterfly wings, coloring the face with chalk pens, and mounting the wings with glue dots. I mold the edges of cut out images around my fingers softly to add more shape and dimension. Affix the butterfly to frame/background with glue stick. I also used my own baby photo in an old slide mount frame for this window. Same instructions for words and it’s okay to mount these, because the do not overlap the outside stencil when assembled. Set aside.
Vision Frame 4: The last vision window uses the cardboard as its background. I purposefully stripped away the top layer of paper to reveal the corrugated inside in this area. Repeat same instructions for “Lady with Umbrella” and words. I had a die cut pear and stamped it with the “Joy” background stamp, then embellished with a grunge number five and sewn-on button. This one needs to be completely assembled later when it is put on the board. Set aside pieces.
Assembly: I further trimmed/cut around the bold outside curl of Swatton Border stencil both sides so I could tuck the frame up inside and show the stencil curl sitting on top of the frame (click on Vision Frame #1 photo to see this detail). Repeat for both top and bottom stencil,both sides. Place the four strips of yellow pot-a-dot cardstock upside down on the cardboard sized 1/4 inch inset on all sides; join with a glue stick on the corners only, making sure not to get the glue near the cut “curls” so I could still tuck the die cut frame inside. Next I used Tacky Glue on the backside of this outside border, all the way around, turned over and stuck to the cardboard. Double check quickly that there is no glue under the “curl”. Then I positioned each frame on the cardboard without glue, centering so there is a small gap in the middle for the letters “I AM”. One by one I lifted and glued the first three frames and their words. Lastly, I glued all the pieces of the “Lady with Umbrella” window directly onto the cardboard. The “I AM” letters are grunge board colored first with Ranger/Tim Holtz Distress Stain in antique bronze. After they were dry, I rubbed the Danube Blue ink pad over the top to add color highlights; affix letters with Tacky Glue holding down for a moment to secure. Each of these four vision window designs could be made into a greeting card. Enjoy!
- STENCILS USED from Stencil Girl Products
- Swatton borders # 1 stencil
- Journal notes stencil
- STAMPS USED from Lost Coast Design Rubberstamps
- Head in hands
- Old Typewriter & Rustic Alphabet Sets
- Time Flies
- Rulers Background
- Butterfly face
- Silhouette Lady with Umbrella
- Joy (the background)
Wishing you an artful journey! Signing off … Cherri Robb
####


