Archives

Let’s Get JOURNALING!

2019 Little Sisters Update and Bring to Class Info

  1. First class is Sunday, January 13 from noon to 3:00p.  I will have store open at 11:30a.
  2. The journal size this year is a 4×7″ inside page reading horizontally.
  3. As always, your journal can be on any topic and any color you like.  However, I have two large boxes of left overs in from my book to share … so if you’re up for birds and can include some natural & kraft colors in your design, woohoo you score!
  4. Some sample pages from my book are shown below.
  5. Check it out … if you invite a friend new to my journaling class, I’ll give you a $10 discount/refund on the class fee.
  6. If you have not already signed up and/or paid, please contact me directly, and I’ll hold your spot.
  7. BRING JAN 13 … PAPER:  8 to 12 sheets of printed, double-sided, 12×12″ cardstock in coordinating design and/or color.  Please do not precut.
  8. BRING JAN 13 … PAPER TRIMMER able to nicely cut 12×12″ inch cardstock.
  9. BRING JAN 13 … BASIC TOOL BOX
  10. CLASS PLAN JAN 13
    1. We will be cutting our inside pages to size, including folded spreads and layered pages.
    2. I will bring my hole drill press so you can hole-punch all pages at one time.
    3. I will provide your matboard already cut to size for front & back covers.


Art Journaling 2019 with Cherri

Sisterhood, Little Sisters, and introducing All Star Sisters

Art Journaling returns in 2019 with three groups at Artsy Stamps and Papercrafts – and continues with the gathering of two established groups, The Sisterhood and The Little Sisters.  Plus, a third group is now open for new participants – the All Star Sisters.

The Sisterhood will meet monthly January through April and work on UFO’s (Unfinished Objects), plus Patsy will provide one product or technique demonstration at each session.  This is the fourth year of a returning group.  The fee will be $5 per session donated to one of Patsy’s animal charities.  It is an art fellowship full of love and laughter.

The Little Sisters and the All Star Sisters will both have six bi-weekly sessions from January through March, meeting every other weekend – Little Sisters on Sunday and All Star Sisters on Saturday.  This year’s project will be based on Cherri’s journal “Autographs from a Bird” (on display at Artsy) which includes paper engineering, techniques and products.  The students provide all their own supplies, while Cherri brings mentoring, demonstrations and many things to share.  $60 for all six sessions, and payment must be made by December 30th to hold your spot.

To begin each student should collect “Cherri’s Tool Box”, which can be found on her blog.  In addition, on Session One each student brings 10 pieces of color coordinated 12×12 cardstock printed on both sides and a good 12” personal paper trimmer.  From there, each week Cherri will post on her blog the next session class plan.  The All Star Sisters must speak to Cherri before joining to assure the class work and homework is a comfortable level for them and that they understand the process (stampincherri@comcast.net).  Maximum 8 on the new group. 

Sisterhood

Sundays

Noon to 3p

Little Sisters

Sundays

Noon to 3p

All Star Sisters

Saturdays

10a to 1p

January 20 January 13 January 12
February 17 January 27 January 26
March 17 February 10 February 9
April 28 February 24 February 23
March 10 March 9
March 24 March 23


TOOLBOX 2019 – Cherri’s Favorite Art Journaling Toolbox

Little Sisters & All Star Sisters Art Journaling – Toolbox Recommendations (Bring what you can, but I usually have tools to share.)

1. Scissors (small/sharp/fine detail cutting)
2. Pencil/pen/paper pad for homework notes
3. Ruler
4. Bone folder
5. Paper clips and/or mini binder clips
6. Good personal paper trimmer … must be 12″
7. ¼ inch hand-held hole punch
8. Paper piercer (awl, aka pokie thing)
9. ADHESIVES (including: UHU glue stick, Skor tape, tacky white glue with fine tip point, glue dots, pop-up dots)
10. Glue book (old magazine/catalog)
11. Small rag/plastic cup to wet for wiping fingers, baby wipes, dish towel/rag to dry hands and/or clean stamps.
12. Distress ink pads (color coordinated to your current project), and blender handles and pads (or make-up sponge)
13. Black permanent ink pad (Versafine, Archival, Momento)
14. FAVORITE TOOLS might include … deckled and postoid scissors, stylus & pad, sand paper/nail file, corner rounder punch, exacto knife, #2 round paint brush, rubber gloves, water mister, stickles.
15. ___________  Plus your own favorites …

Journaling Session SIX- Sisterhood

Sisterhood Session SIX is Sunday, April 22.  Please let me know if/when you will not be attending any session

Class Plan

  1. Mostly work on your journals.
  2. Show and tell.
  3. Embellishments … buttons, lace, ribbon, jewels, bling, flowers, charms, beads … anything you like! I’ll help you with beaded or flowered edges if it fits your design.
  4. Set June reunion date for potluck brunch and show & tell with Little Sisters.
  5. Work on cover.

Bring to Class List is

  1. All your regular journal goodies, and of course, your journal!
  2. Any embellishments you’d like to use… I’ll bring goodies to share.
  3. And, your Cherri Tool Box, of course.

Thanks & see you soon!!

###

Journaling Session FIVE- Sisterhood

Sisterhood Session FIVE is Sunday, April 15.  Please let me know if/when you will not be attending any session.

Homework

  1. Hope you’ve enjoyed working on your journals,  I look forward to show and tell!
  2. Finish collecting your share items for the other sisters.

Class Plan

  1. Mostly work on your journals.
  2. Show and tell.
  3. Challenge with postage stamps.
  4. Challenge with scraps.
  5. Demo: Background wash with Dylusions paints.
  6. Finish sharing with the other sisters.

Bring to Class List is

  1. All your regular journal goodies, and of course, your journal!
  2. All your paper scraps, including cardstock and distress oxide ink papers you made.
  3. A personal paper trimmer.
  4. One or two favorite die cuts that go with your journal.
  5. A palette, if you have (nothing else required)
  6. Any postage stamps you may have collected that might color coordinate to your journal.  I have some to share.
  7. And, your Cherri Tool Box, of course.

Thanks & see you soon!!

###

Journaling Session FOUR- Sisterhood & Little Sisters

Sisterhood Session FOUR is Sunday, March 25.  Little Sisters Session FOUR is, April  8 (no class Easter Sunday). Please let me know if/when you will not be attending any session.

Homework

  1. Finish installing your scrappy tags and the six spreads designed for the last session.
  2. Begin designing another six spreads.  Remember to create one fold-over page edge and one wrap-around page edge in each signature.  Use the oxide paper and die cuts created for/at last session.  Make more oxide ink paper as needed.  If you are comfortable with your spreads, please go ahead and affix.  If you would like my input, just clip them to the page and ask me for review time.
  3. Begin using the sister share items in your spreads if they work, please don’t force anything.
  4. Finish collecting share items for sisters using the shared information sheet distributed  (such as stamps, die cuts, images … any tidbit that goes with their theme & colors).
  5. Bring your list of chapter/signature/journal titles and/or words you would like Cherri to typeset; or do them yourselves.

Class Plan

  1. If requested, spread design/layout review time with Cherri.
  2. Finish sharing with sisters; collect sister signatures on labels/tabs.
  3. Show & tell!! Let’s see what you’re done!!
  4. Class work #1 … water color with Prima Water Soluable Oil Pastels (I provide water colors).
  5. Class work #2 … Dylusion paint background techniques (I provide paints).

Bring to Class List is

  1. Your JOURNAL, along with a small collection of your images, scraps, paper and doodahs.
  2. A #2 round watercolor brush
  3. A palette or substitute plastic surface
  4. Two or three images stamped on watercolor paper with a permanent ink pad (preferably MEMENTO, second choice is ARCHIVAL, third choice is VERSAFINE.  Do not use DISTRESS INKS, they are water-based) .  Pick images that have open space that allow for coloring and work with your theme.  I will bring my MEMENTO ink pads to share, and we can heat-set the images.
  5. Four sheets of quality and smooth surface 8-1/2 x 11″ card stock (white, natural, or off-white).
  6. Distress oxide ink pads — only the colors you are using in your journal.
  7. A few permanent ink pads in colors coordinating to your journal.
  8. A small stash of paper towel, a rag, and baby wipes.
  9. Share items for sisters.
  10. Your list of six chapter/signature/journal titles and/or words if you would like Cherri to typeset.
  11. And, your Cherri Tool Box, of course.

Thanks & see you soon!!

###

Journaling Session THREE- Little Sisters (only)

Little Sisters Journaling Session Three is Sunday, March 18.  Please refer to the photograph below to see Class Plan example. Also, please let me know if/when you will not be attending any session.

Homework

  1. Finish your scrappy tags (oxide ink tag, tags are 1/8 inch larger than book so you can trim 1/8 inch before or after you add to book [or leave sticking out], ink the backside top 2 inches where hole is [it will show], stamp with flourish or background, add washi tape along the seam where the two tags touch in center, affix into the inside of the first page of each signature/chapter).  Call me if you have questions.
  2. Finish oxide inking all the paper/file folders I handed out in class. Iron flat before bringing to class.
  3. Begin designing your layout for six spreads, please do not glue/affix into your journal.  A spread is when you open the journal and you are looking at both the left and right pages, which are coordinated.  You might start by selecting a mini wall calendar image for each signature that sits to the right of the oxide tags you have added at the beginning of each signature.  Continue by creating mats and other layers, then use a paper clip or mini binder clip to hold onto the page (see photo below).
  4. Begin collecting share items for six or more sisters using the shared information sheet distributed  (such as stamps, die cuts, images … any tidbit that goes with their theme & colors).
  5. Your list of three chapter/signature/journal titles and/or words you would like Cherri to typeset.

Class Plan

  1. Make tickets to use throughout.
  2. Create flourishes to use throughout.
  3. Create numbers to use throughout.
  4. Add ribbons to scrappy tags.
  5. Review your spreads with Cherri and begin affixing into your journal.
  6. Begin sharing with sisters (six or more).
  7. Die cut labels for share signatures.
  8. Fold-over/wrap around paper edge engineering … one of each in each signature.

Bring to Class List is

  1. Your JOURNAL with 8 scrappy tags affixed and six spreads laid out with paper clips.
  2. Distress oxide ink pads — only the colors you are using in your journal.
  3. All the paper, tags and folders you have colored with distress oxide inks.
  4. Your remaining mini wall calendar images or other images/stamps related to your journal.
  5. Seam tape or other ribbon for the 8 scrappy tags.
  6. A few permanent ink pads in colors coordinating to your journal.
  7. Flourish (stamps or die cuts) and background/theme stamps that will be recurring throughout your journal. I will bring plenty to share.
  8. I need one person to bring another big shot die cut machine … so we have three total (store, mine & ____)
  9. Washi tape or tissue tape if you’d like to continue using as journal accents.
  10. A small stash of paper towel, a rag, and baby wipes.
  11. Any ticket stamps, punches or die cuts you might like to use (I have plenty to share).
  12. Share items for six or more sisters.
  13. Your list of three chapter/signature/journal titles and/or words you would like Cherri to typeset.
  14. And, your Cherri Tool Box, of course.

I will bring a set of my titles to share which are …

  1. Ride along with me
  2. The journey has just begun
  3. Be happy and just enjoy
  4. Spread your wings and fly
  5. We rise by lifting others
  6. Dream up

Thanks & See you soon!!

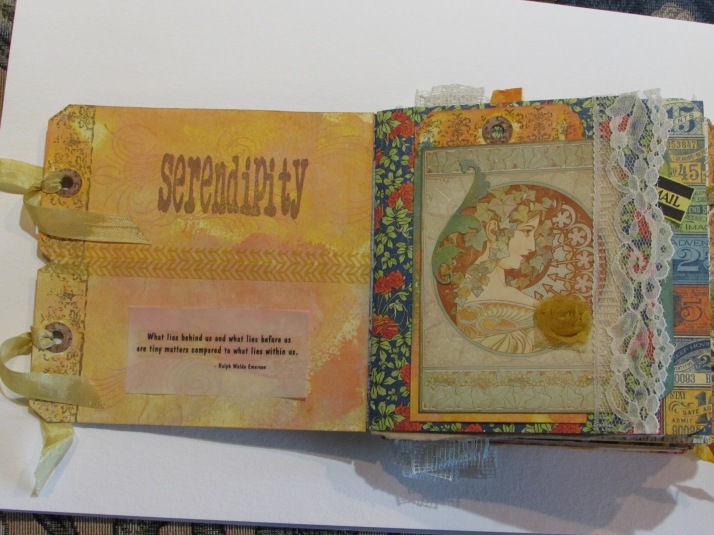
This is a spread … open to left & right pages. Notice they are color coordinated. The right side has an image designed with a tag mat, a piece of ribbon, a flourish die cut, inked edges and one embellishment flower.  The left side has a word stamp and a quote sitting on top of the background-stamped-oxide-inked scrappy tag, with ribbons in the tags.


### the end

Journaling Session THREE- Sisterhood (only)

Sisterhood Session Three is this Sunday, March 11.  Please refer to the photograph below to see Class Plan example. Also, please let me know if/when you will not be attending any session.

Homework

  1. Finish your scrappy tags (oxide ink tag, tags are 1/8 inch larger than book so you can trim 1/8 inch before or after you add to book [or leave sticking out], ink the backside top 2 inches where hole is [it will show], stamp with flourish or background, add washi tape along the seam where the two tags touch in center, affix into the inside of the first page of each signature/chapter).  Call me if you have questions.
  2. Finish oxide inking all the paper/file folders I handed out in class. Iron flat before bringing to class.
  3. Begin designing your layout for six spreads, please do not glue/affix into your journal.  A spread is when you open the journal and you are looking at both the left and right pages, which are coordinated.  You might start by selecting a mini wall calendar image for each signature that sits to the right of the oxide tags you have added at the beginning of each signature.  Continue by creating mats and other layers, then use a paper clip or mini binder clip to hold onto the page (see photo below).
  4. Begin collecting share items for four or more sisters using the shared information sheet distributed  (such as stamps, die cuts, images … any tidbit that goes with their theme & colors).
  5. Your list of six chapter/signature/journal titles and/or words you would like Cherri to typeset.

Class Plan

  1. Make tickets to use throughout.
  2. Create flourishes to use throughout.
  3. Create numbers to use throughout.
  4. Add ribbons to scrappy tags.
  5. Review your spreads with Cherri and begin affixing into your journal.
  6. Begin sharing with sisters (four or more).
  7. Die cut labels for share signatures.
  8. Fold-over engineering … two versions in each signature.

Bring to Class List is

  1. Your JOURNAL with 12 scrappy tags affixed and six spreads laid out with paper clips.
  2. Distress oxide ink pads — only the colors you are using in your journal.
  3. All the paper, tags and folders you have colored with distress oxide inks.
  4. Your remaining mini wall calendar images or other images/stamps related to your journal.
  5. Seam tape or other ribbon for the 12 scrappy tags.
  6. A few permanent ink pads in colors coordinating to your journal.
  7. Flourish (stamps or die cuts) and background/theme stamps that will be recurring throughout your journal. I will bring plenty to share.
  8. I need one person to bring another big shot die cut machine … so we have three total (store, mine & PATSY’S, done thank you!)
  9. Washi tape or tissue tape if you’d like to continue using as journal accents.
  10. A small stash of paper towel, a rag, and baby wipes.
  11. Any ticket stamps, punches or die cuts you might like to use (I have plenty to share).
  12. Share items for four or more sisters.
  13. Your list of six chapter/signature/journal titles and/or words you would like Cherri to typeset.
  14. And, your Cherri Tool Box, of course.

I will bring a set of my titles to share which are …

  1. Ride along with me
  2. The journey has just begun
  3. Be happy and just enjoy
  4. Spread your wings and fly
  5. We rise by lifting others
  6. Dream up

Thanks & See you soon!!

This is a spread … open to left & right pages. Notice they are color coordinated. The right side has an image designed with a tag mat, a piece of ribbon, a flourish die cut, inked edges and one embellishment flower.  The left side has a word stamp and a quote sitting on top of the background-stamped-oxide-inked scrappy tag, with ribbons in the tags.


### the end

Journaling Session Two – Sisterhood & Little Sisters

Are you ready to have FUN, FUN, FUN!!!  Well, the Distress Oxide Ink shipment is in the store … and Patsy brought in a boatload of Antique Link & Tattered Rose pads and reinkers.  Sisterhood Session Two is this Sunday, February 25 and Little Sisters is Sunday, March 4.  Please refer to the photographs below to see Class Plan samples. Also, please let me know if/when you will not be attending any session.

Class Plan is to use the Distress Oxide Inks to make create backgrounds for

  1. Scrappy tags to reinforce the first page of each signature.
  2. Extra tags to use here & there
  3. Mats/frames
  4. Die cuts and labels
  5. Paper to stamp images on
  6. Tickets and
  7. Ribbon distressing

Next, we will be stamping flourishes or backgrounds on the oxide inked tags, inking the edges, putting them into our books with UHU glue sticks (required), and covering the seam with washi tape. I will supply the scrappy tags for the signatures and 2 extra tags, well as one legal size file folder each.  Please bring feel free to bring extra tags, file folders, mixed media and watercolor paper if you like.  Quality off white/natural card stock also works (not copy paper).

Bring to Class List is

  1. Your book (ha ha)
  2. Your distress oxide ink pads and reinkers.  The store has one set of pads to share, and I have about half of the colors to share.
  3. Your mini wall calendar images (one for each signature/chapter), or other images.
  4. Seam tape ribbon to match the lightest color in your color palette (I will provide one as a teaching sample, you can buy more at the store).  You may want to put one in each scrappy tag (equals 12 for Sisters, and 8 for Little Sisters).
  5. Versafine or Archival ink pads in black or dark brown … make sure they are reinked and juicy!! However, if you want your flourish/background stamped on the tag in a lighter background color, bring other colors of Archival/permanent ink pads (the store and I have sets to share).
  6. Flourish or background stamps … I will bring plenty to share.  Please feel free to bring your favorites as well, or stamps that match your theme.
  7. Washi tape that matches your theme/color palette (I will bring a bunch to share).
  8. Your heat tool … we will have stations to set up for six tools, so there will be sharing.
  9. Your craft iron … again six stations and sharing.
  10. A water spritzer bottle.
  11. Latex gloves if you don’t want inky fingers.
  12. Paper towels, rags, and baby wipes.
  13. And, your Cherri Tool Box, of course.

ALSO, start thinking about your chapter titles or words you would like to use in your book.  I will print and share my titles, and would be happy to set yours in the fancy font I used, and bring to the following session.  My titles were …

  1. Ride along with me
  2. The journey has just begun
  3. Be happy and just enjoy
  4. Spread your wings and fly
  5. We rise by lifting others
  6. Dream up

Thanks & See you soon!!

Scrappy tags … go in the front of each signature/chapter

Die cut and label sample from distress oxide paper


Image stamped on distress oxide paper

Second sample die cut & label

Extra tag used for image mat

Piece of tag used … just because

Another tag with distress oxide ink … I’ll share

Seam binding ribbon with oxide ink application

Tickets with on oxide paper (see right side vertical strip)


### the end

Little Sisters journaling begin February 18

The LITTLE SISTERS CLASSES are Sundays, from 12:00 to 3:30p at Artsy Stamps & Papercrafts in Loveland, CO.  Cost is $40 for all FOUR sessions, students provide their own supplies. Little Sisters are doing three signatures (instead of 5), which requires 9 pieces of 12×6″cardstock to begin. If your cardstock has a design that needs to be upright, be sure to cut the cardstock horizontally so when folded in half, you don’t have any cats or dogs laying on their backs. If you are not sure, just bring the 12×12″ sheets to class and I’ll help you cut.  Also bring to class your mini wall calendar that will be used as journal images (or whatever other image set you have selected).

  1. February 18
  2. March 4
  3. March 18
  4. April 15

Please read the following three blog posts for the Sisterhood.  The only difference for the first Little Sisters’ class is the 9 pieces of 12×6″cardstock, which will then be folded in half to create a 6×6″ journal.  I’ll have a class plan for the four sessions at our first meeting. The front doors will be open at 11:30a, so we can start at noon.

January 5 — THIS AND THAT

January 5 — TOOLBOX

February 8 — SISTERHOOD BEGINS.  Please look at the photos and bring specialty paper, if you like.

See you soon my little ones!  xoxo Cherri

Sisterhood begins Sunday, February 11


Be sure to double check the January 5 posts regarding “bring to class” and “toolbox”.  In addition, if you like bring some vellum, mulberry, hand-made, or other special paper to sew into each signature, as shown in the photos below.  I will bring some vintage sheet music to share.  Also, bring to class your mini wall calendar that will be used as journal images (or whatever other image set you have selected). And, if you like, bring last year’s journal for show and tell … or anything else you would like to share.  I’ll have the front door of the store open at 11:30a so we can start at noon.


##

This & That plus Sistehood Class Plan

Happy New Year to the Sisterhood … I’m getting excited for our next journaling session to begin … only 23 more days!!!  See you Sunday, January 28th at noon.

This & That #1:  I know that Patsy has called you asking of your journal theme and color palette.  I’ll pull a few goodies from my studio to share with you as well.  Most of you have decided, no worries, the others still have 23 days.

This & That #2:  If you have not already paid, payment is due by January 15th.  Call me if that is a problem (970) 203-5051.


I’ve provided an outline of the class plan below, just as an FYI.  There are only two requirements for the first class.

  1. Bring 15 sheets of cardstock cut to 6 by 12 inches.  When we sew it together in class, it will make a 6  by 6 inch book. I will provide all the materials to sew and bind the book.
  2. Start collecting the “Cherri Journaling Toolbox”.  Click on the link below to jump back to an earlier blog post. Remember UHU glue stick is always a requirement.
  3.  https://angelsandpears.wordpress.com/2018/01/05/toolbox-cherris-favorite-art-journaling-toolbox-2/

SISTERHOOD CLASS PLAN (does not apply to Little Sisters, yours will be posted later this month)

WEEK ONE

  1. BUILD book
  2. DECLARE design theme & colors

WEEK TWO

  1. MAKE TAGS

WEEK THREE

  1. Begin sharing with sisters
  2. Tickets throughout
  3. Flourish design throughout
  4. Numbers throughout

WEEK FOUR

  1. Scraps … strips challenge
  2. Scraps … ATC challenge
  3. Labels for shared items
  4. Continue sharing with sisters

WEEK FIVE

  1. Something METAL
  2. Something already made
  3. Signature page
  4. Continue sharing with sisters

WEEK SIX

  1. Sister ideas, suggestions, requests
  2. Continue sharing with sisters

PRODUCTS

  1. Distress Oxide Inks
  2. Color a la Cremes, water soluble oil pastels
  3. New Dylusions paint colors, “wash technique by Sue T”
  4. Distress Collage Medium, Vintage
  5. … to be determined

###


TOOLBOX – Cherri’s Favorite Art Journaling Toolbox

Sisterhood Journal – Toolbox Recommendations (Bring what you can, but I usually have tools to share.)

1. Scissors (small/sharp/fine detail cutting)
2. Pencil/pen/paper pad for homework notes
3. Ruler
4. Bone folder
5. Paper clips and/or mini binder clips
6. Paper cutter/trimmer (6 or 12”)
7. ¼ inch hand-held hole punch
8. Paper piercer (awl, aka pokie thing)
9. ADHESIVES (including: UHU glue stick, Skor tape, tacky white glue with fine tip point, glue dots, pop-up dots)
10. Glue book (old magazine/catalog)
11. Small rag/plastic cup to wet for wiping fingers, baby wipes, dish towel/rag to dry hands and/or clean stamps.
12. Distress ink pads (color coordinated to your current project), and blender handles and pads (or make-up sponge)
13. Black permanent ink pad (Versafine, Archival, Momento)
14. FAVORITE TOOLS might include … deckled and postoid scissors, stylus & pad, sand paper/nail file, corner rounder punch, exacto knife, #2 round paint brush, rubber gloves, water mister, stickles.
15. ___________  Plus your own favorites …

Sisterhood & Little Sisters Journaling 2018

“A Scrappy Tag Book” (inspired by Somerset Studio’s Jul/Aug 2017 issue)

Overview ….  Session 1, we will build our journal book by sewing 5 signatures together and then binding them with a scrap of muslin fabric. Session 2, we will create background color on 12 tags using Distress Oxide Inks and mount them into the book to sturdy the cover and fronts of each signature.  Sessions 3 through 6, we will ART JOURNAL.

There are two challenges.  FIRST is to use images from a mini wall calendar (approximately 8×8 inches or smaller).  They can be found at most stores selling wall calendars; I bot mine at Barnes & Noble.  I also used a book postcards from the same artist (Alphfonse Mucha).  Resources are shown below.

The SECOND challenge during weeks 3 to 6 will be to share a stamp, die cut or anything that goes with the others’ journals based on their theme and color.  In other words, if there are twelve sisters, each will share a little something with the other eleven.

BEGIN by collecting cardstock to go into your journal.  15 pieces of 6 x 12 inch CARDSTOCK (not text weight paper) will each be folded in half  horizontally to create the book size of 6 by 6 inches.  Each signature will have three of the 6×12 inch pieces (3 sheets x 5 signatures = 15 pieces of 6×12 inch cardstock).  Signatures can all be from the same line of paper, or like mine, they can all be different.  I used one of line of Graphic 45 for a signature, and two different lines of G45 for two other signatures.  The last two signature cardstocks were all mixed up with colors that went together.

The SISTERHOOD DATES are Sundays, from 12:00 to 3:30p at Artsy Stamps & Papercrafts in Loveland, CO.  Cost is $60 for all six sessions, students provide their own supplies.

  1. January 28
  2. February 11
  3. February 25
  4. March 11
  5. March 25
  6. April 8.

The LITTLE SISTERS DATES are Sundays, from 12:00 to 3:30p at Artsy Stamps & Papercrafts in Loveland, CO.  Cost is $40 for all FOUR sessions, students provide their own supplies. Little Sisters are doing three signatures only which requires 9 pieces of 12×6″cardstock to begin.

  1. February 18
  2. March 4
  3. March 18
  4. April 15

Additional resources are ….


See you in the New Year!!!

Mar 26 – Class Plan and Homework

SISTERHOOD CLASS PLAN March 26         

Please bring to class …

  1. Small round paint brush (#2 if you have)
  2. Glue book
  3. Paper towels
  4. Baby wipes
  5. Rags
  6. Neutral cardstock … off white, tan, or light colored in your color palette
  7. Distress reinkers in your color palette, if you have …I’ll bring stuff to share

Technique 1 – twinkling H2O’s:

  • mist color pots
  • lightly stir color
  • clean off brush on pot edge, then in water, dab brush dry on towel
  • dip in color, test on scrap
  • color and shade as desired

Technique 2 – paint glaze

  • mix paint and gel medium, equal parts
  • scrape on paper with plastic card

Technique 3 – reinker to craft sheet

  • lightly drag reinker glass tip on craft sheet, do not squeeze
  • mist with water
  • lightly scratch stir
  • blot paper flat into color pools
  • drag edges in left over color

Technque 4 – distress crayons

  • mist small spot on craft sheet
  • dip small round brush into water
  • dab onto end of crayon to pick up color
  • repeat to achieve shade desired

Technique 5 – rusty hinge

  • dab on yellow
  • dab on rust … leaving half yellow showing
  • dab on rush … leave half of yellow and rush showing
  • blend slightly

Technique 6 – double stamping

  • using precision stamp press
  • place paper, align stamp, ink stamp
  • press to paper, reink & repeat!

###